> ## Documentation Index
> Fetch the complete documentation index at: https://openmetadata-add-ontology-explorer-docs.mintlify.site/llms.txt
> Use this file to discover all available pages before exploring further.
# Okta SSO | OpenMetadata Authentication Integration
> Use Okta’s implicit flow for browser-based apps to issue ID tokens directly to the frontend, enabling fast, lightweight user authentication.
# Implicit Flow
### Step 1: Configuring the App
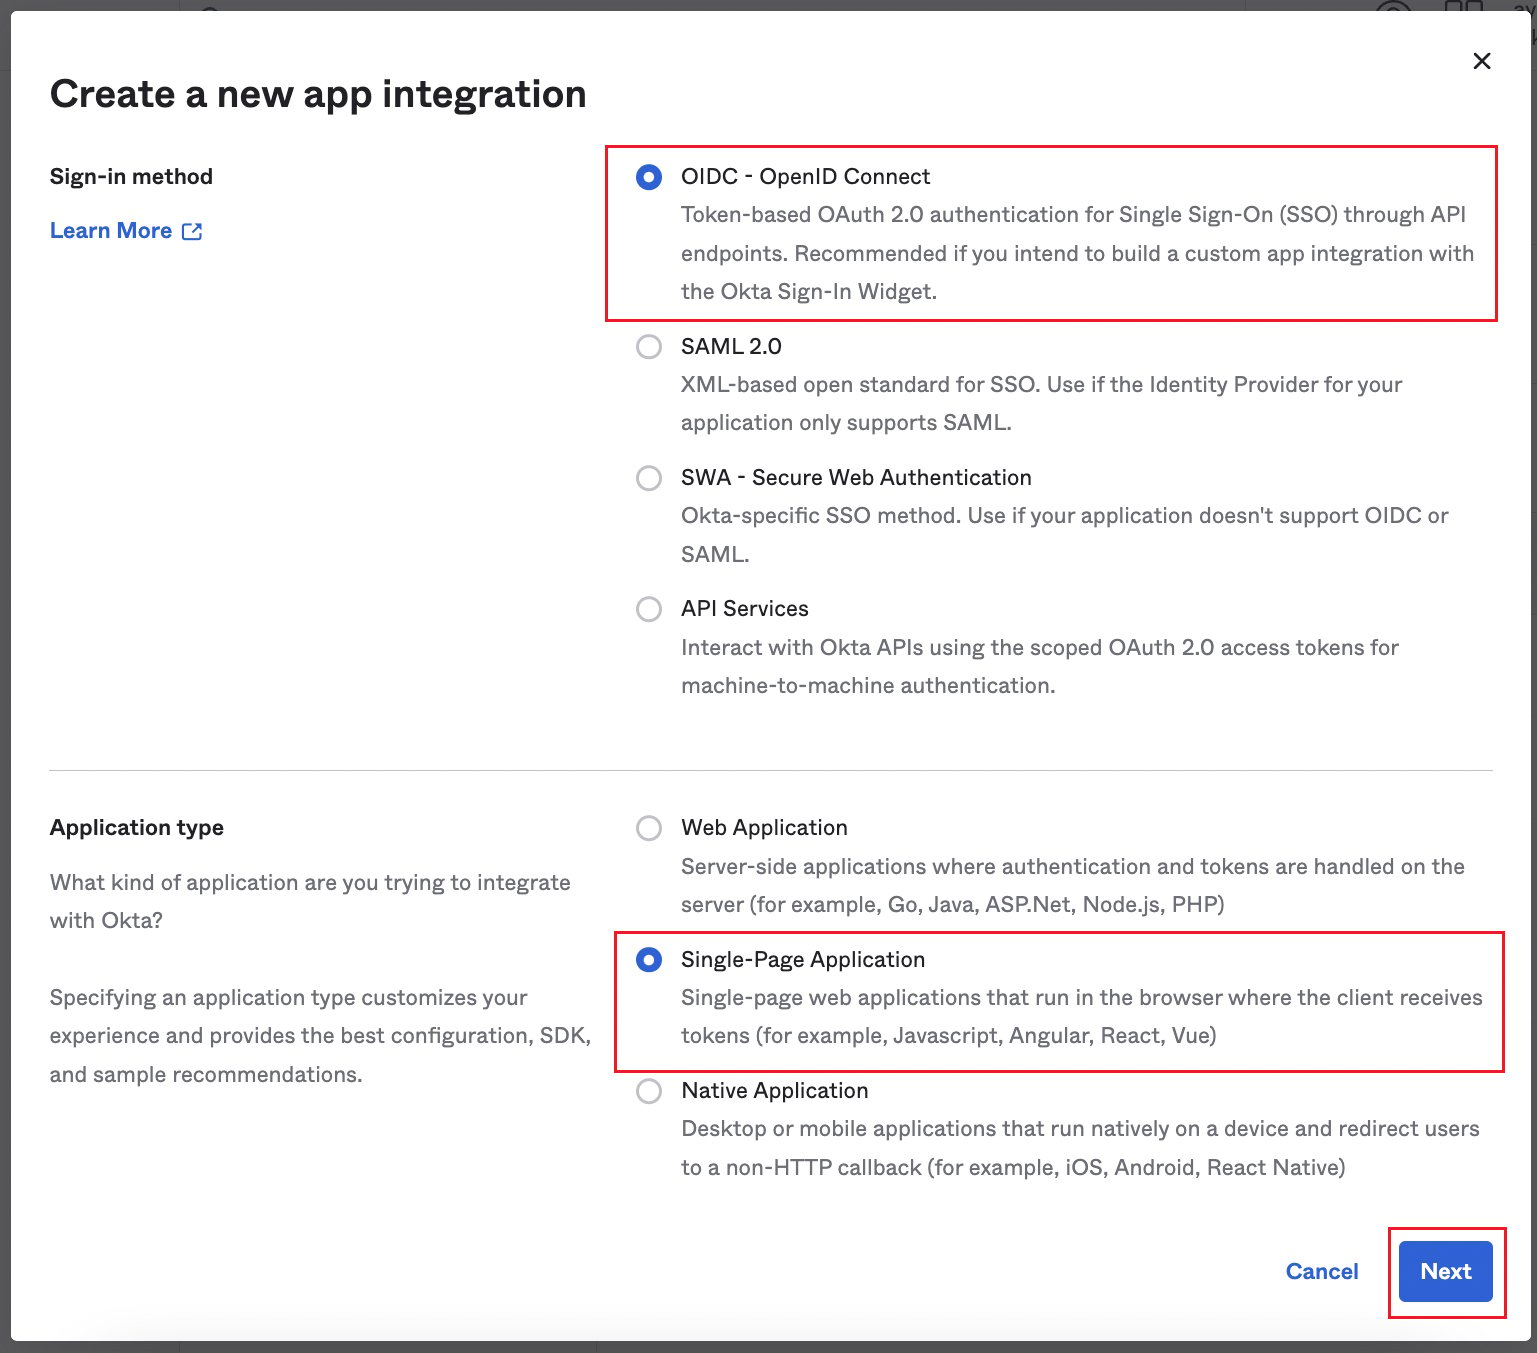
* Once you are in the **Create a new app integration** page, select **OIDC - OpenID Connect**.
* Next, select the **Application type -> Single-Page Application**.
* Once selected, click **Next**.
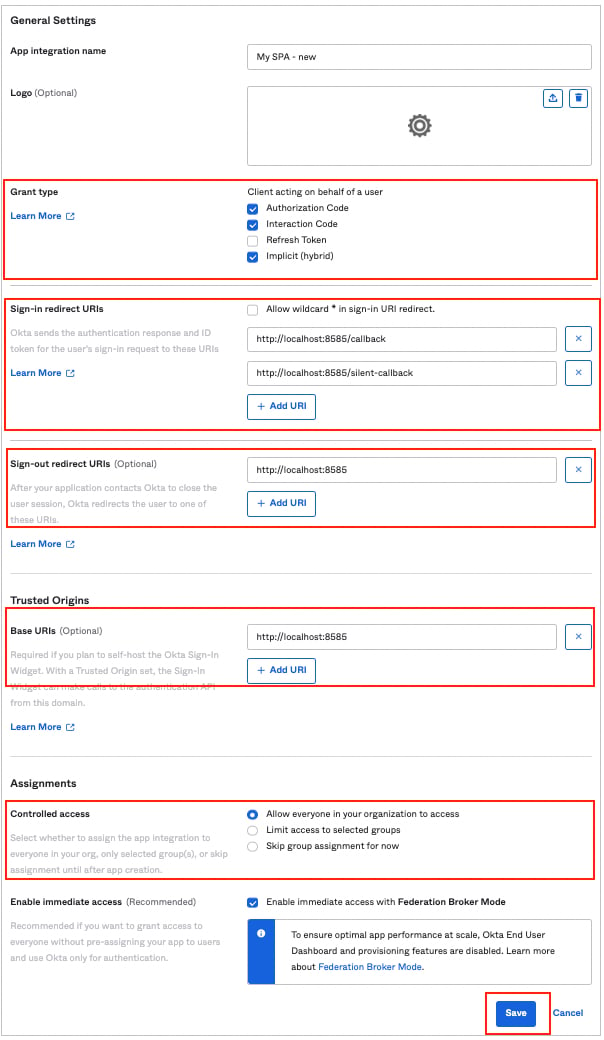
 * From the **General Settings** page,
* Enter an **App integration name**
* Select the following in **Grant type**:
* **Authorization Code**
* **Refresh Token** - For the refresh token behavior, it is recommended to select the option to 'Rotate token after every use'.
* **Implicit (hybrid)** - Select the options to allow ID Token and Access Token with implicit grant type.
* Enter the **Sign-in redirect URIs**
* `http://localhost:8585/callback`
* `http://localhost:8585/silent-callback`
* Enter the **Sign-out redirect URIs**
* Enter the **Base URIs**
* Select the required option for **Controlled access**
* Click **Save**.
* From the **General Settings** page,
* Enter an **App integration name**
* Select the following in **Grant type**:
* **Authorization Code**
* **Refresh Token** - For the refresh token behavior, it is recommended to select the option to 'Rotate token after every use'.
* **Implicit (hybrid)** - Select the options to allow ID Token and Access Token with implicit grant type.
* Enter the **Sign-in redirect URIs**
* `http://localhost:8585/callback`
* `http://localhost:8585/silent-callback`
* Enter the **Sign-out redirect URIs**
* Enter the **Base URIs**
* Select the required option for **Controlled access**
* Click **Save**.
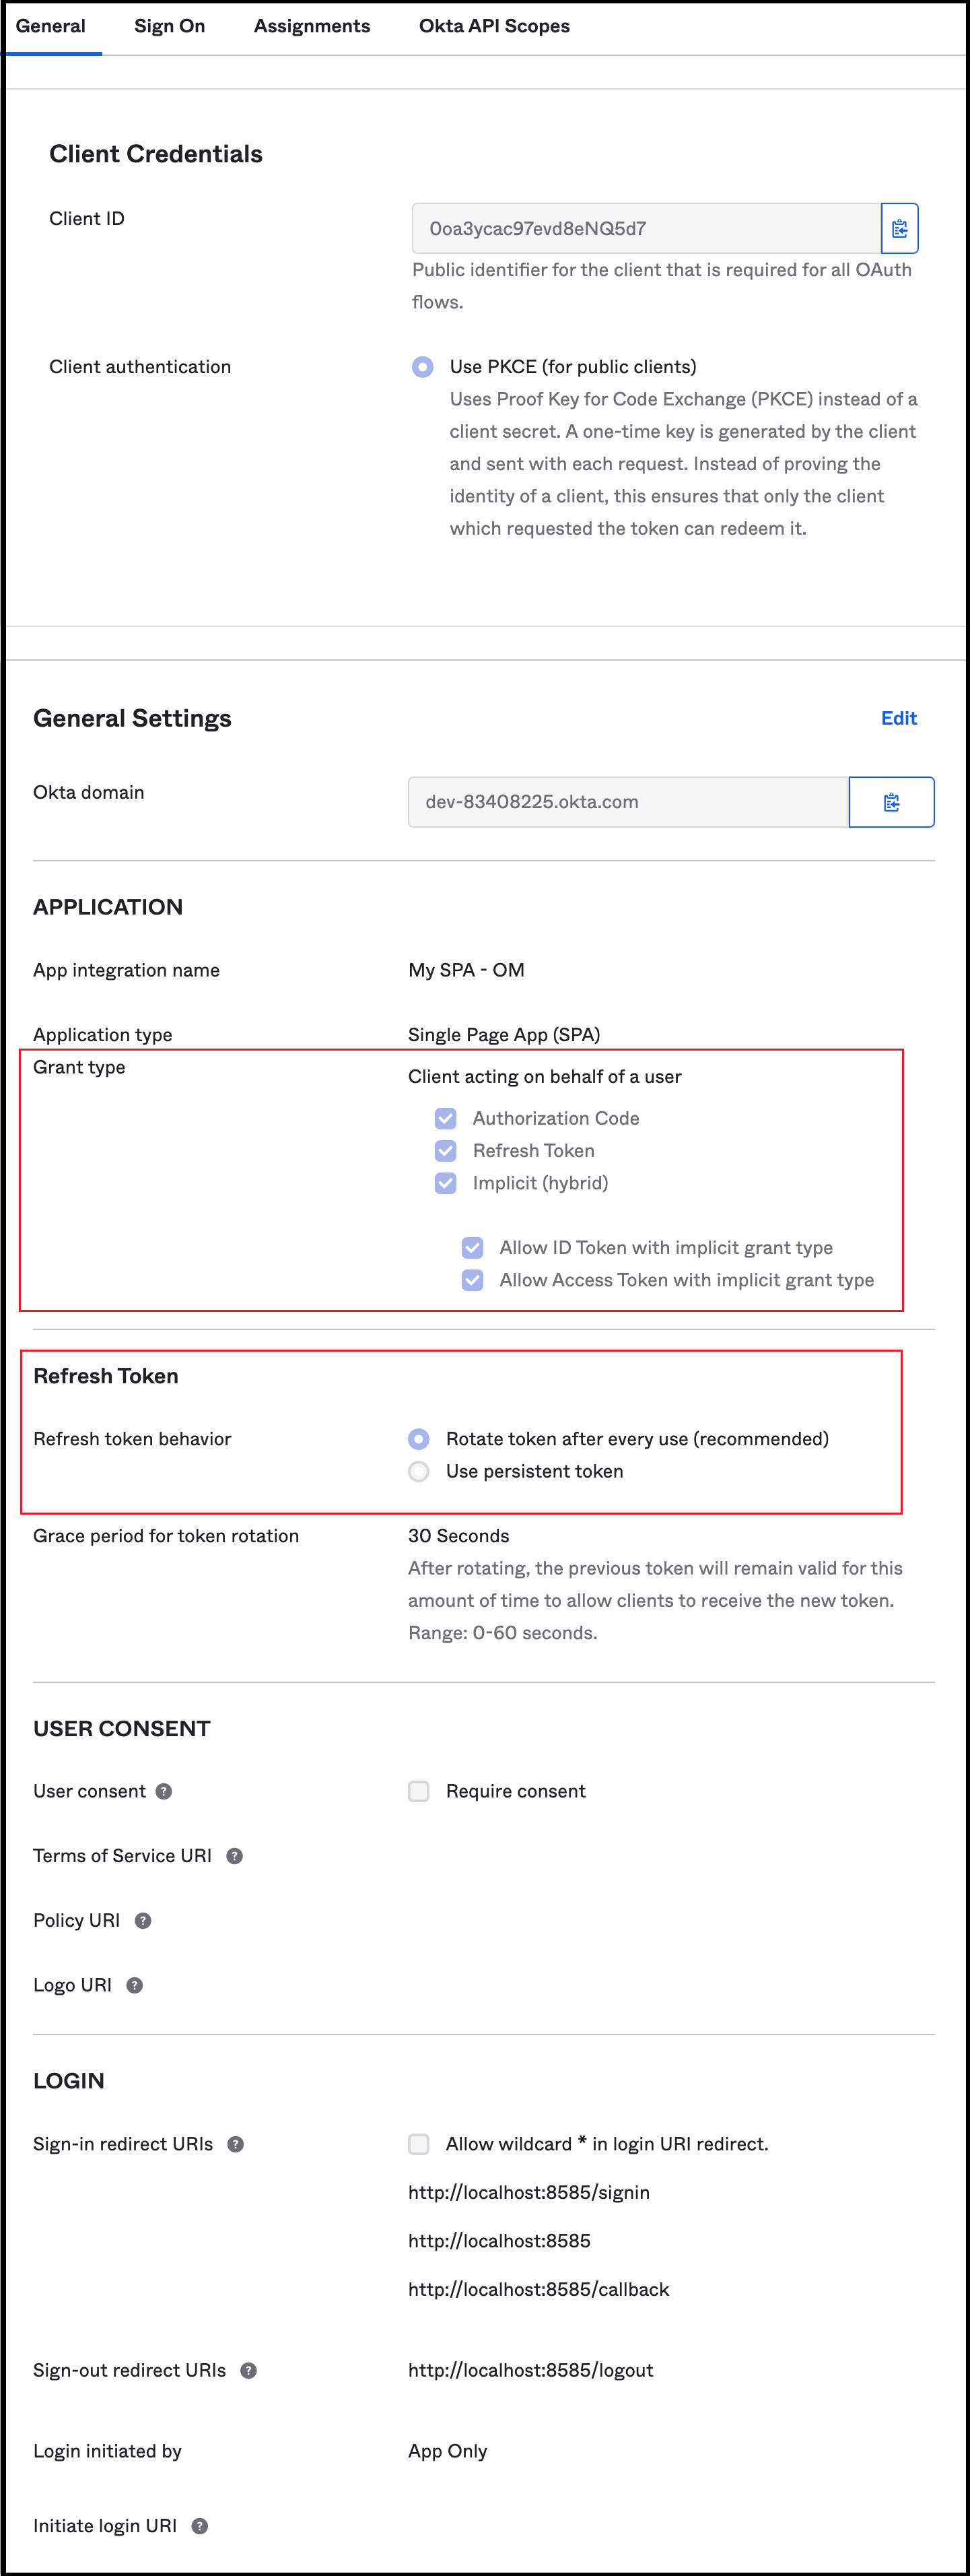
 * The app is now configured.
 ### Step 2: Add Authorization Server to get the Issuer URL
#### New Authorization Server
It is recommended to create a separate authorization server for different applications. The authorization server needs an endpoint, which'll be the Issuer URL.
* Click on **Security -> API** in the left navigation panel.
### Step 2: Add Authorization Server to get the Issuer URL
#### New Authorization Server
It is recommended to create a separate authorization server for different applications. The authorization server needs an endpoint, which'll be the Issuer URL.
* Click on **Security -> API** in the left navigation panel.
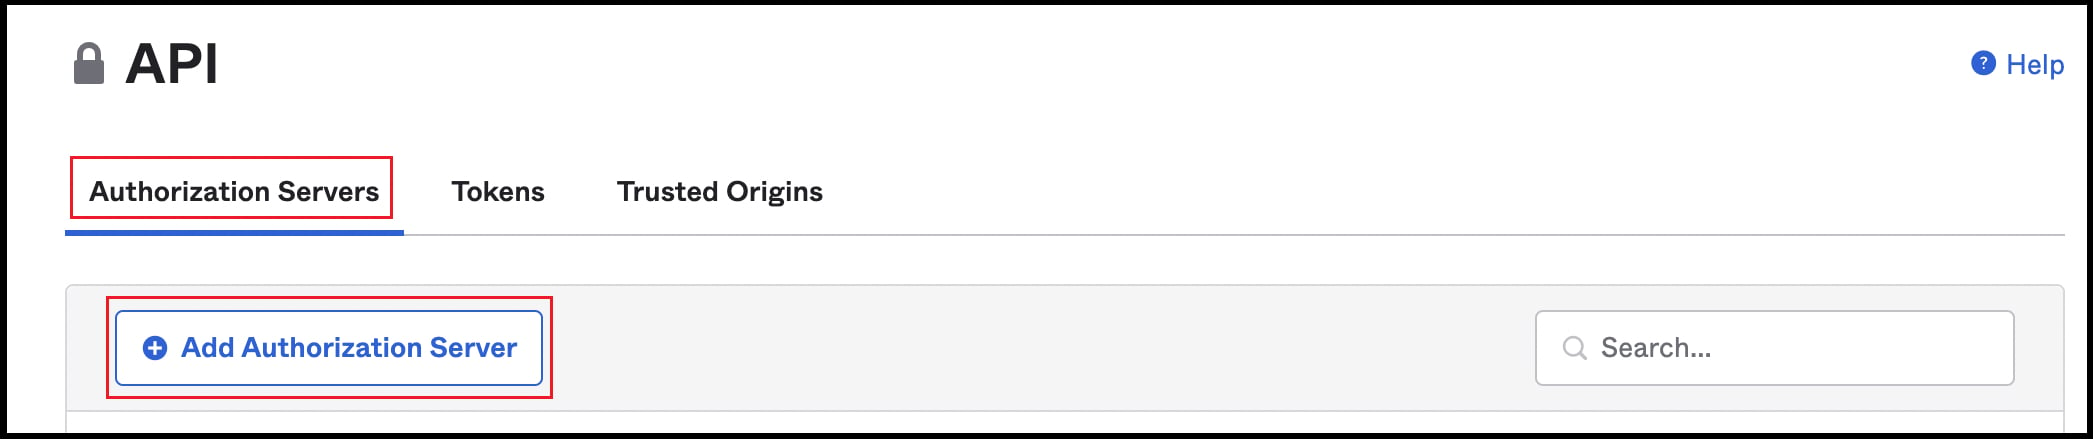
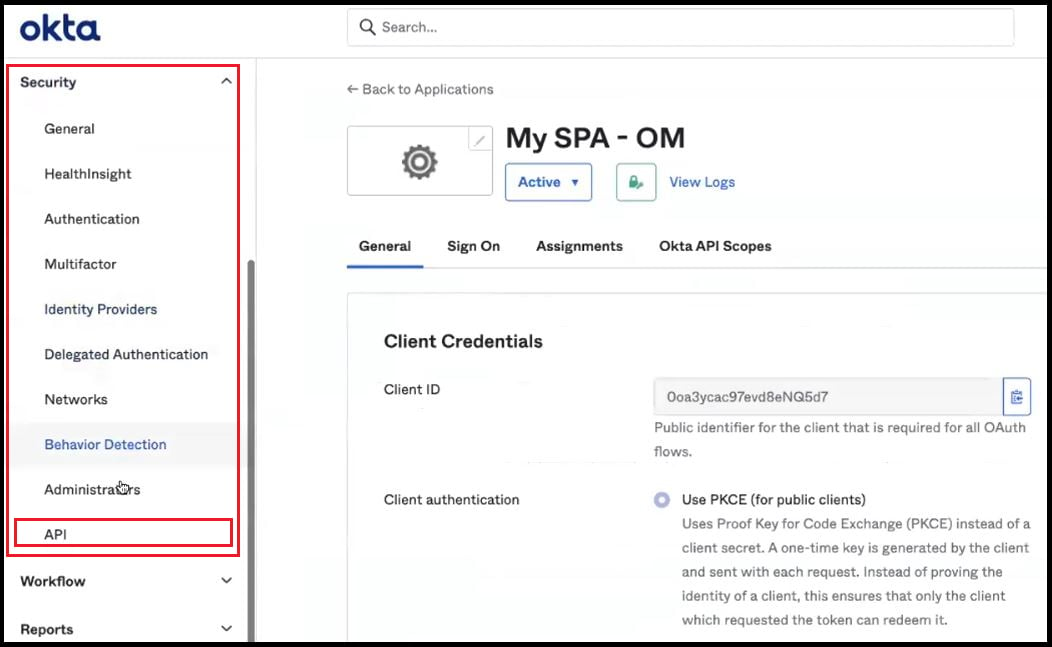 * From the **Authorization Servers** tab, click on **Add Authorization Server** button.
 * Enter a Name and Description.
* While creating the authorization server, an **Audience** must be provided for the server. The Audience is the **Client ID** of the single page application that was created. Refer the next Step 7 to locate the Client ID.
* **Save** the changes.
* Enter a Name and Description.
* While creating the authorization server, an **Audience** must be provided for the server. The Audience is the **Client ID** of the single page application that was created. Refer the next Step 7 to locate the Client ID.
* **Save** the changes.
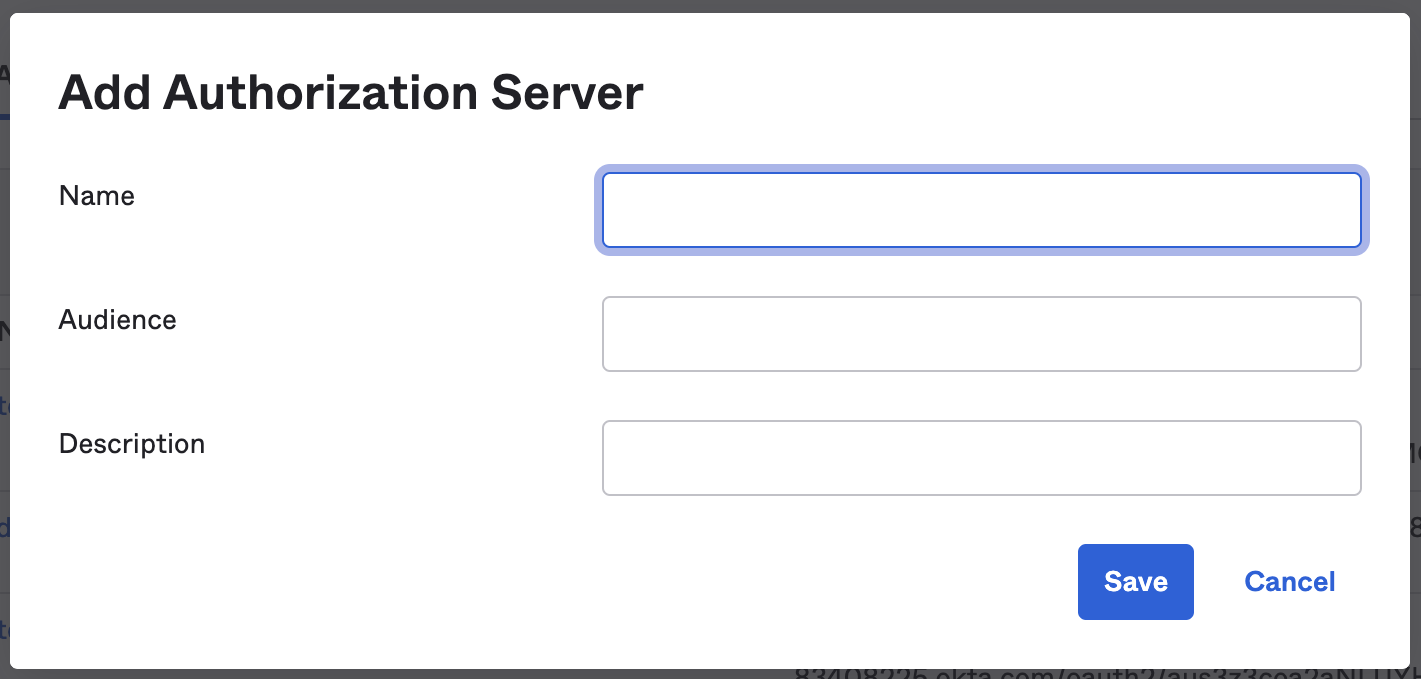 This will generate the Issuer URL.
#### Default Authorization Server (not recommended )
It is recommended to create a separate authorization server for different applications. The authorization server needs an endpoint, which'll be the Issuer URL.
* Click on **Security -> API** in the left navigation panel.
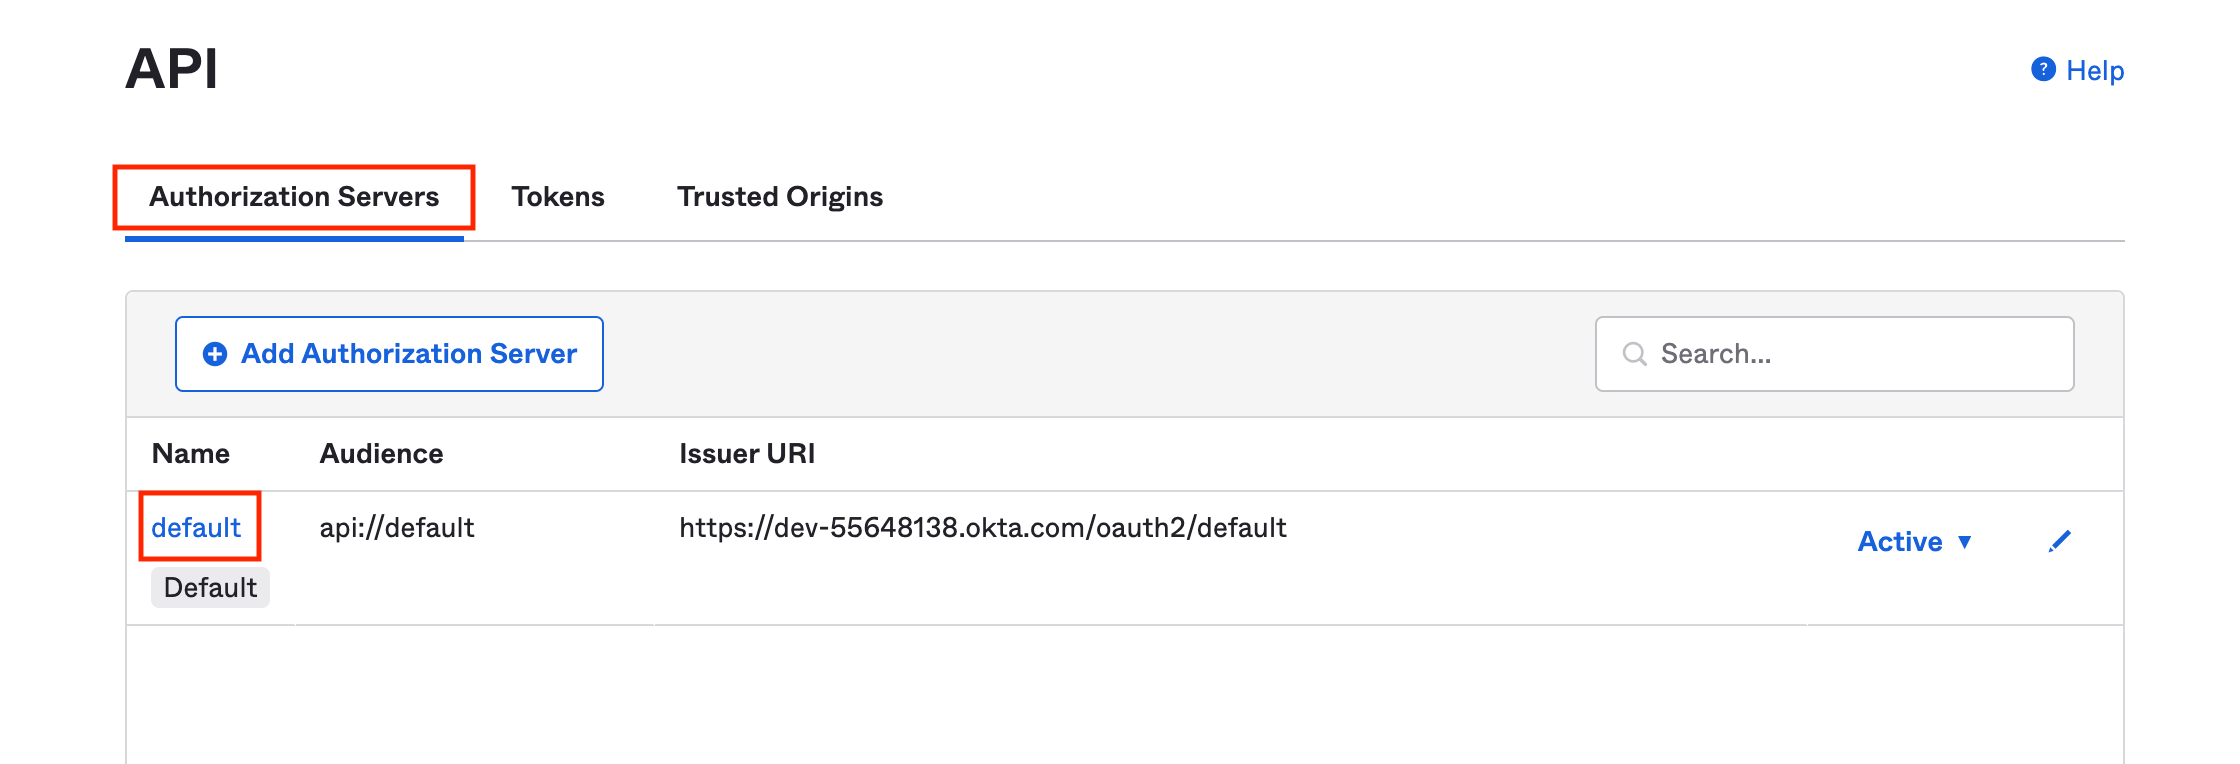
* From the **Authorization Servers** tab, click on **default** server.
This will generate the Issuer URL.
#### Default Authorization Server (not recommended )
It is recommended to create a separate authorization server for different applications. The authorization server needs an endpoint, which'll be the Issuer URL.
* Click on **Security -> API** in the left navigation panel.
* From the **Authorization Servers** tab, click on **default** server.
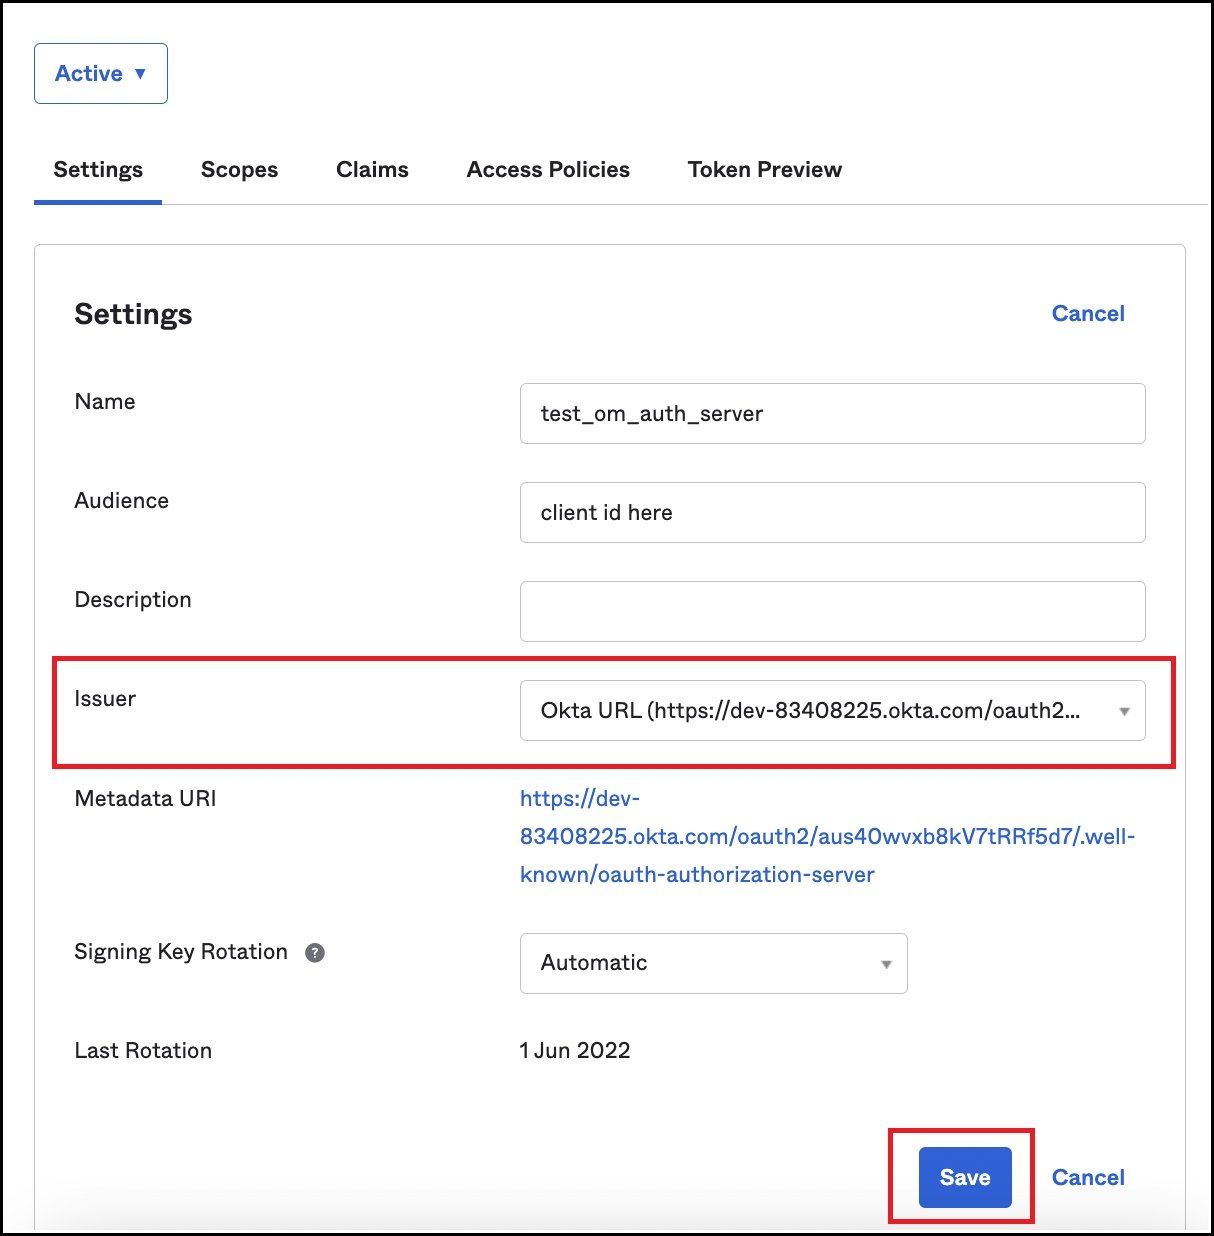
 ### Step 3: Change the Issuer URL from Dynamic to Okta URL
Once the Authorization Server has been added, navigate to Security >> API >> Authorization Servers and click on the authorization server created in the previous step.
### Step 3: Change the Issuer URL from Dynamic to Okta URL
Once the Authorization Server has been added, navigate to Security >> API >> Authorization Servers and click on the authorization server created in the previous step.
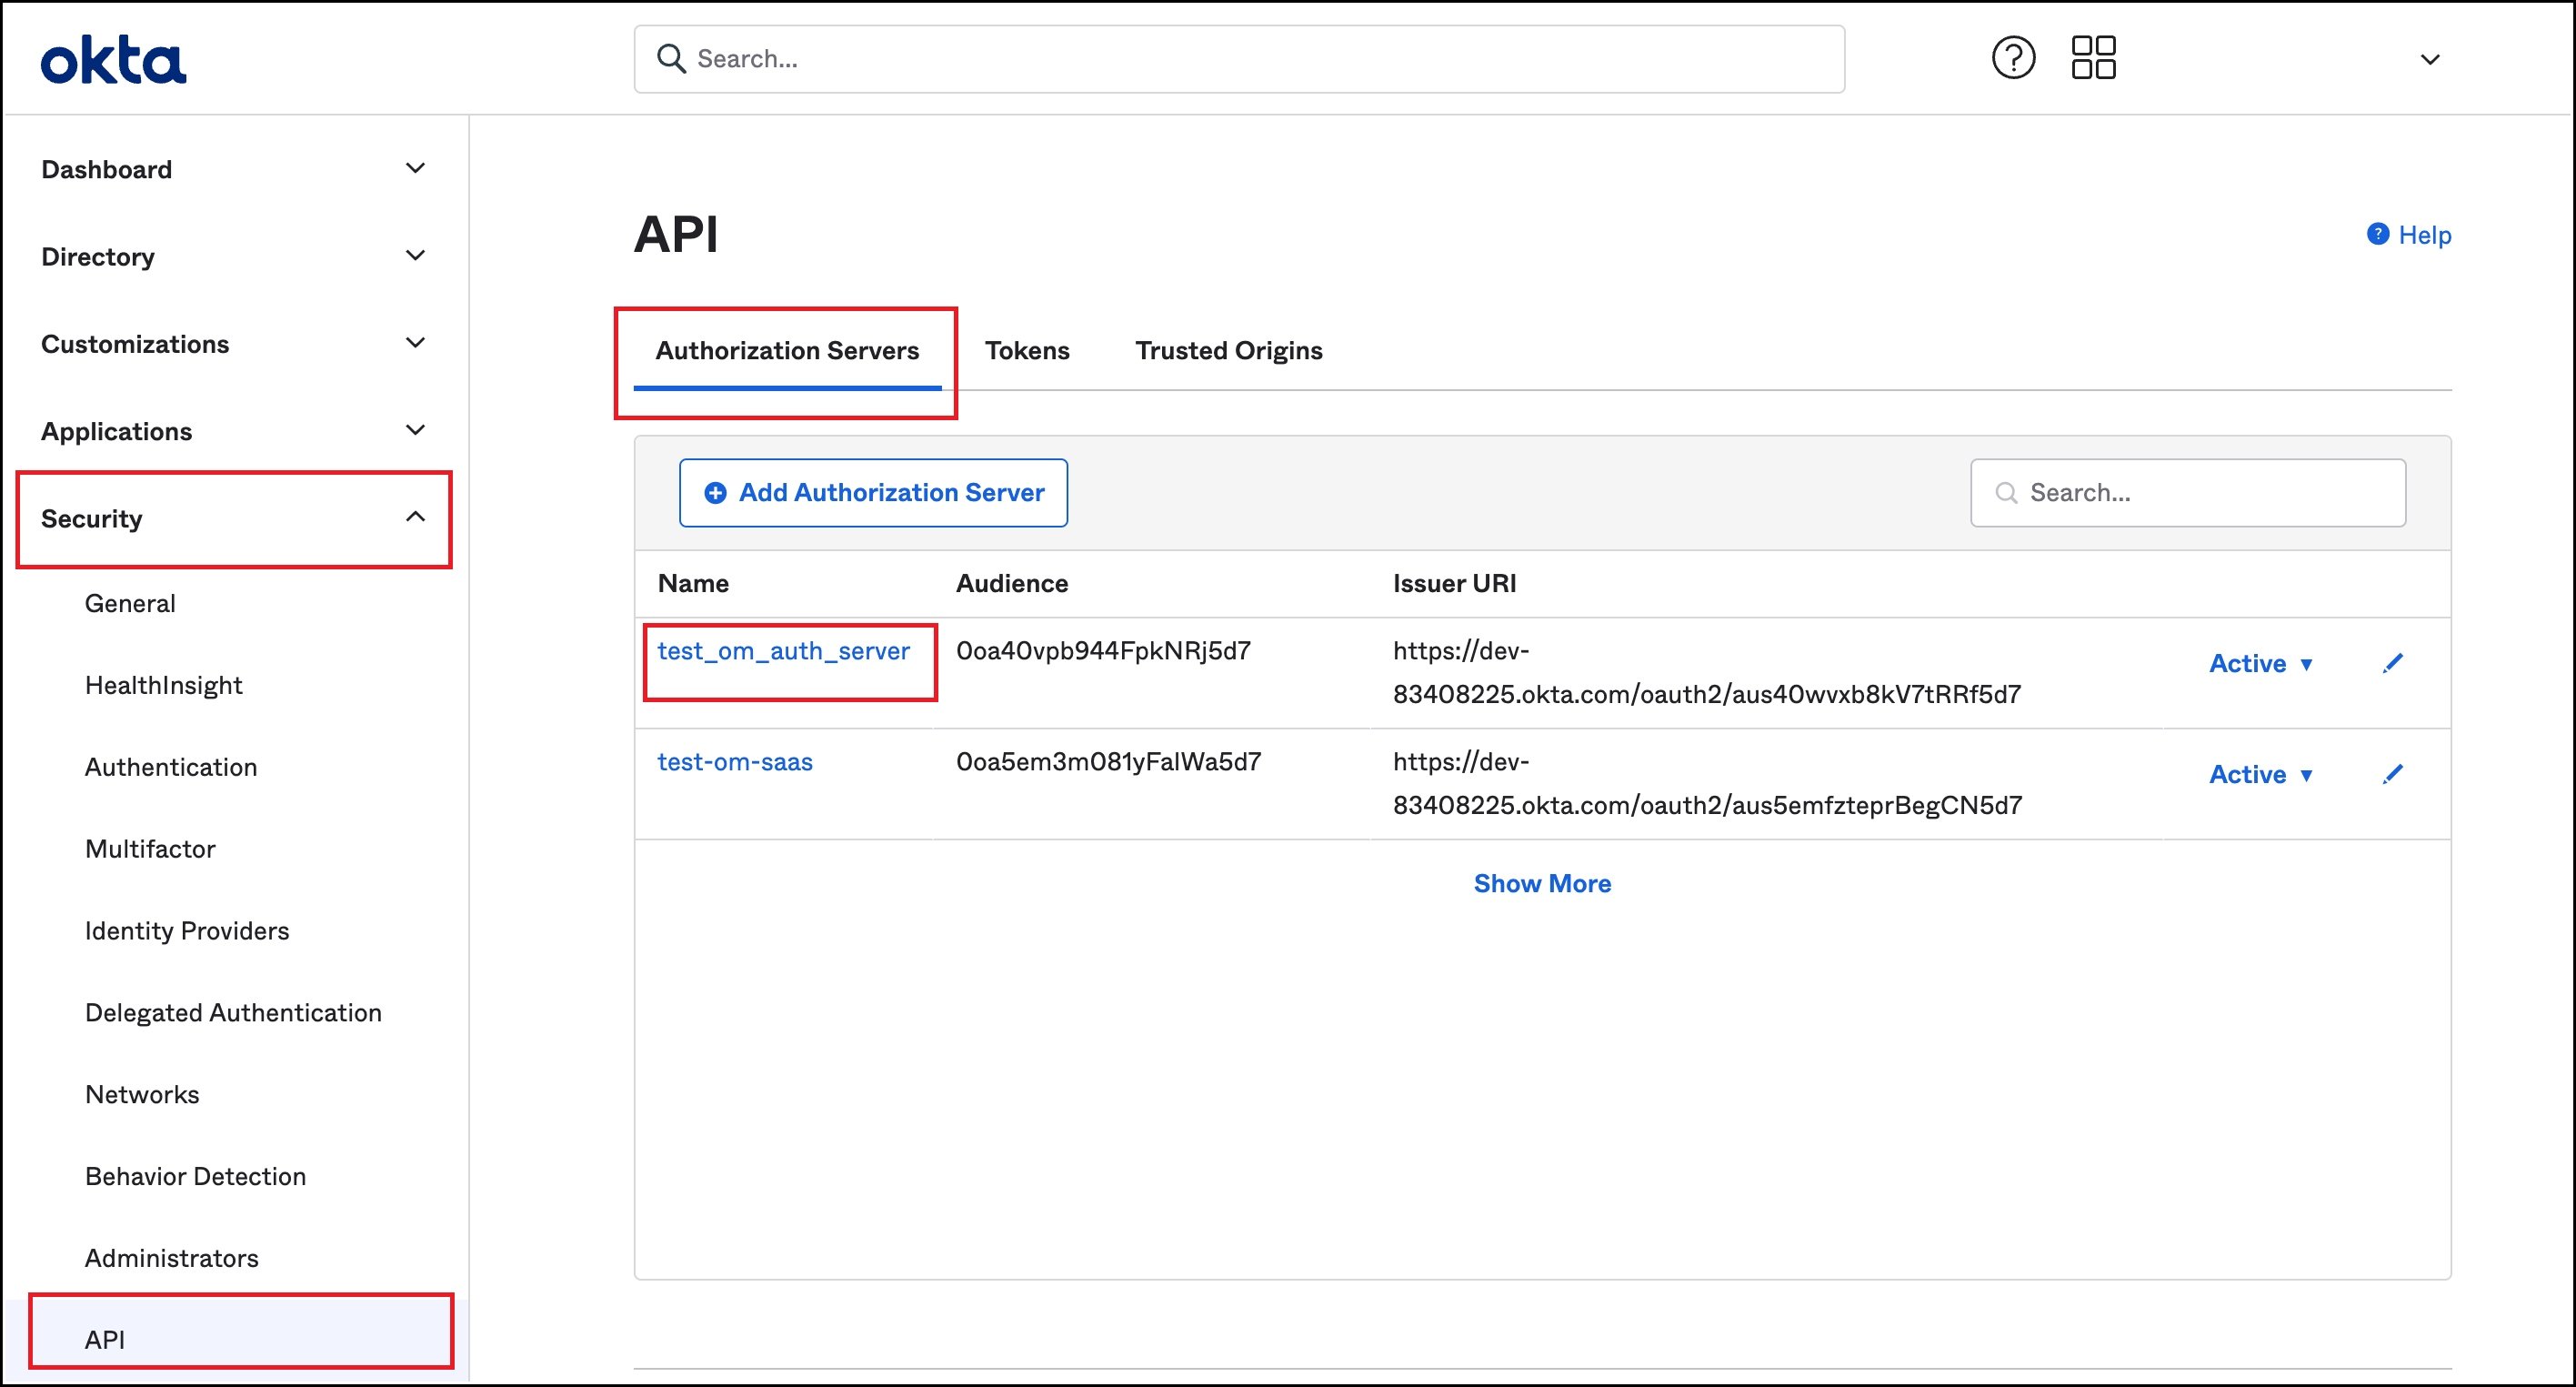 The Issuer URL shows up as Dynamic by default. Change the Issuer URL to Okta URL and save the changes.
 ### Step 4: Create a Default Scope
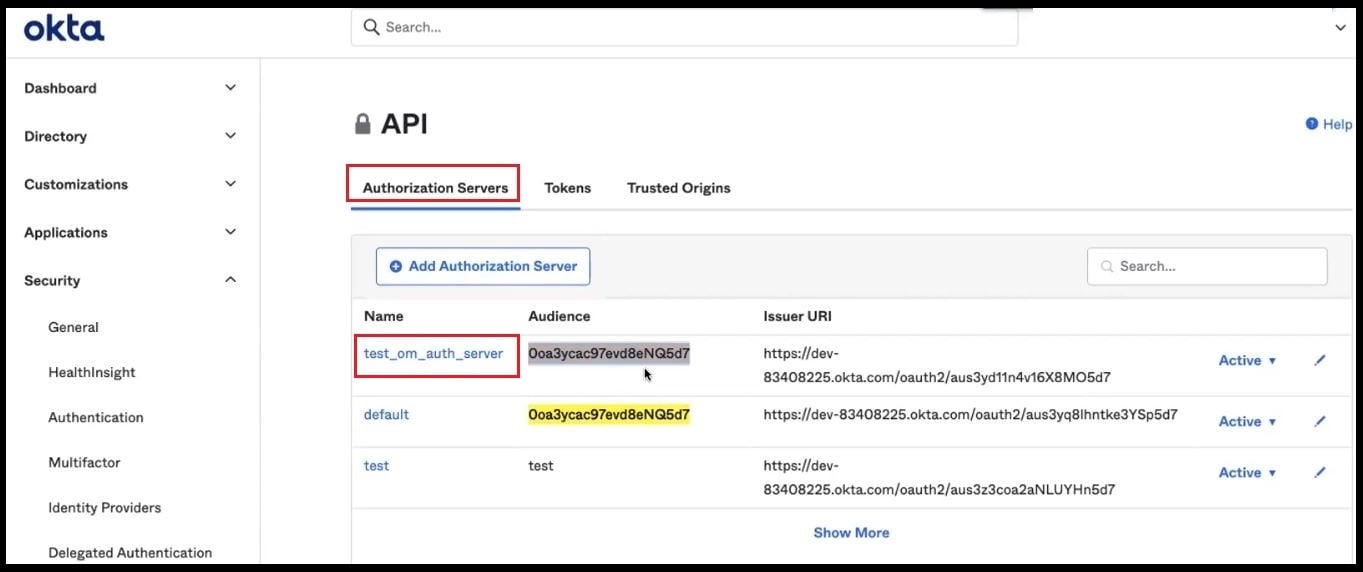
* To create a default scope from **Security -> API**, click on the required **Authorization Server**.
### Step 4: Create a Default Scope
* To create a default scope from **Security -> API**, click on the required **Authorization Server**.
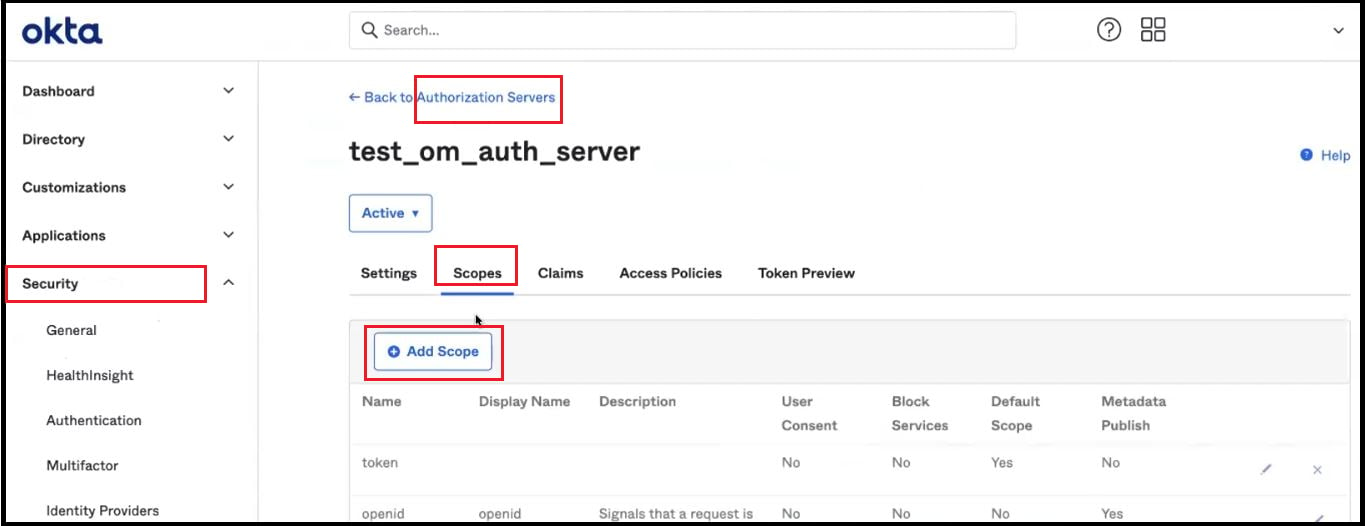
 * In the resulting page, click on the **Scopes** tab
* Click on **Add Scope**
* In the resulting page, click on the **Scopes** tab
* Click on **Add Scope**
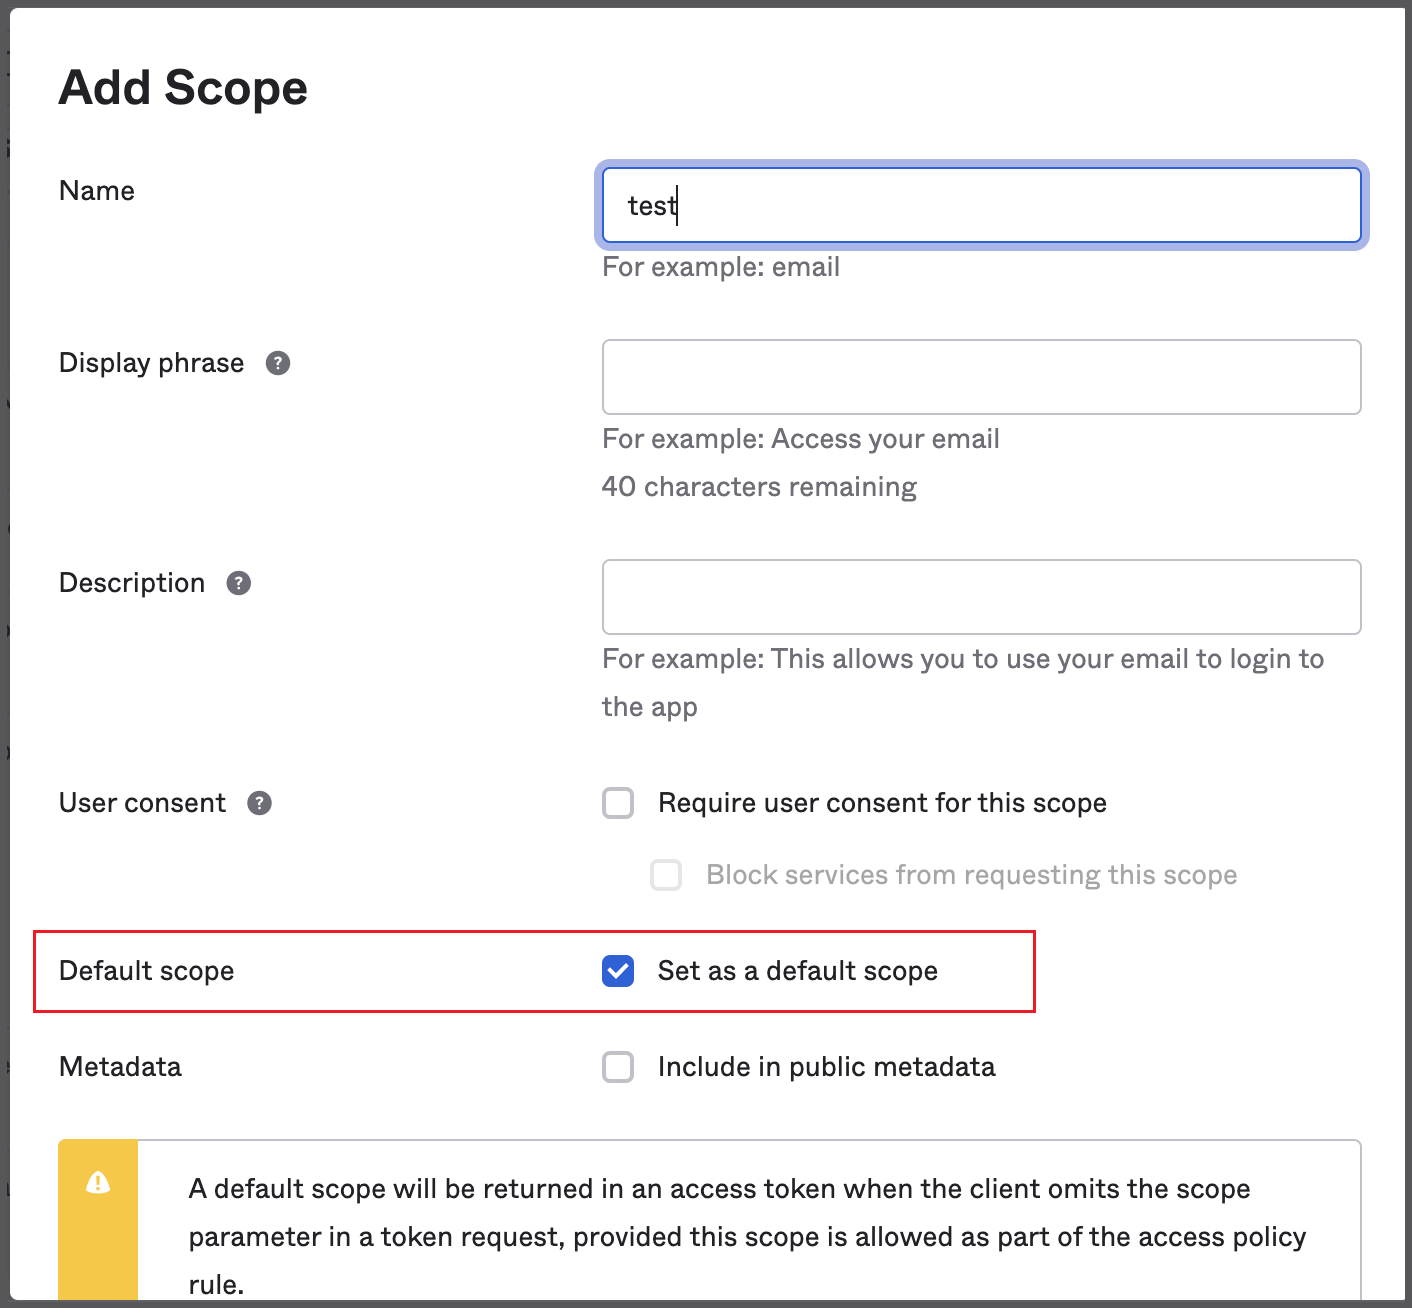
 * Set as a **Default Scope**.
 ### Step 5: Add New Access Policy and Rule
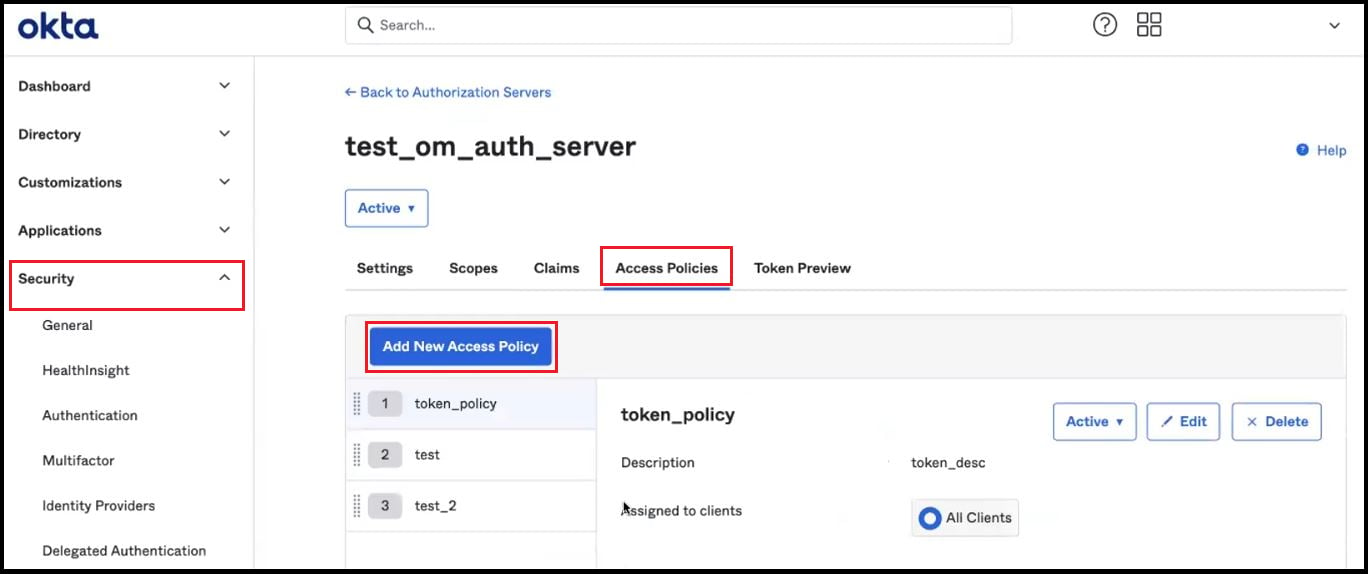
* From **Security -> API**, click on the required **Authorization Server**
* Navigate to the **Access Policies Tab**
* Click on **Add New Access Policy**
### Step 5: Add New Access Policy and Rule
* From **Security -> API**, click on the required **Authorization Server**
* Navigate to the **Access Policies Tab**
* Click on **Add New Access Policy**
 * To create a policy, add a Name and Description.
* Assign the policy to the required clients.
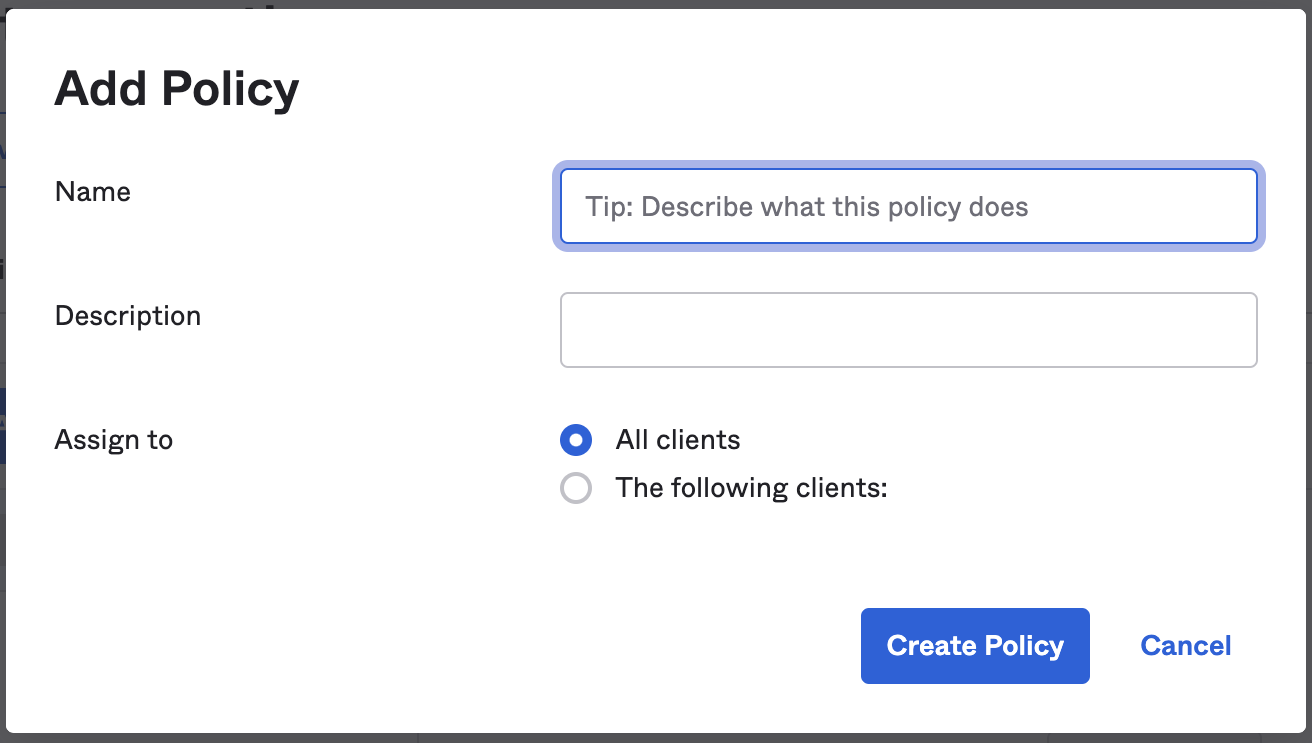
* To create a policy, add a Name and Description.
* Assign the policy to the required clients.
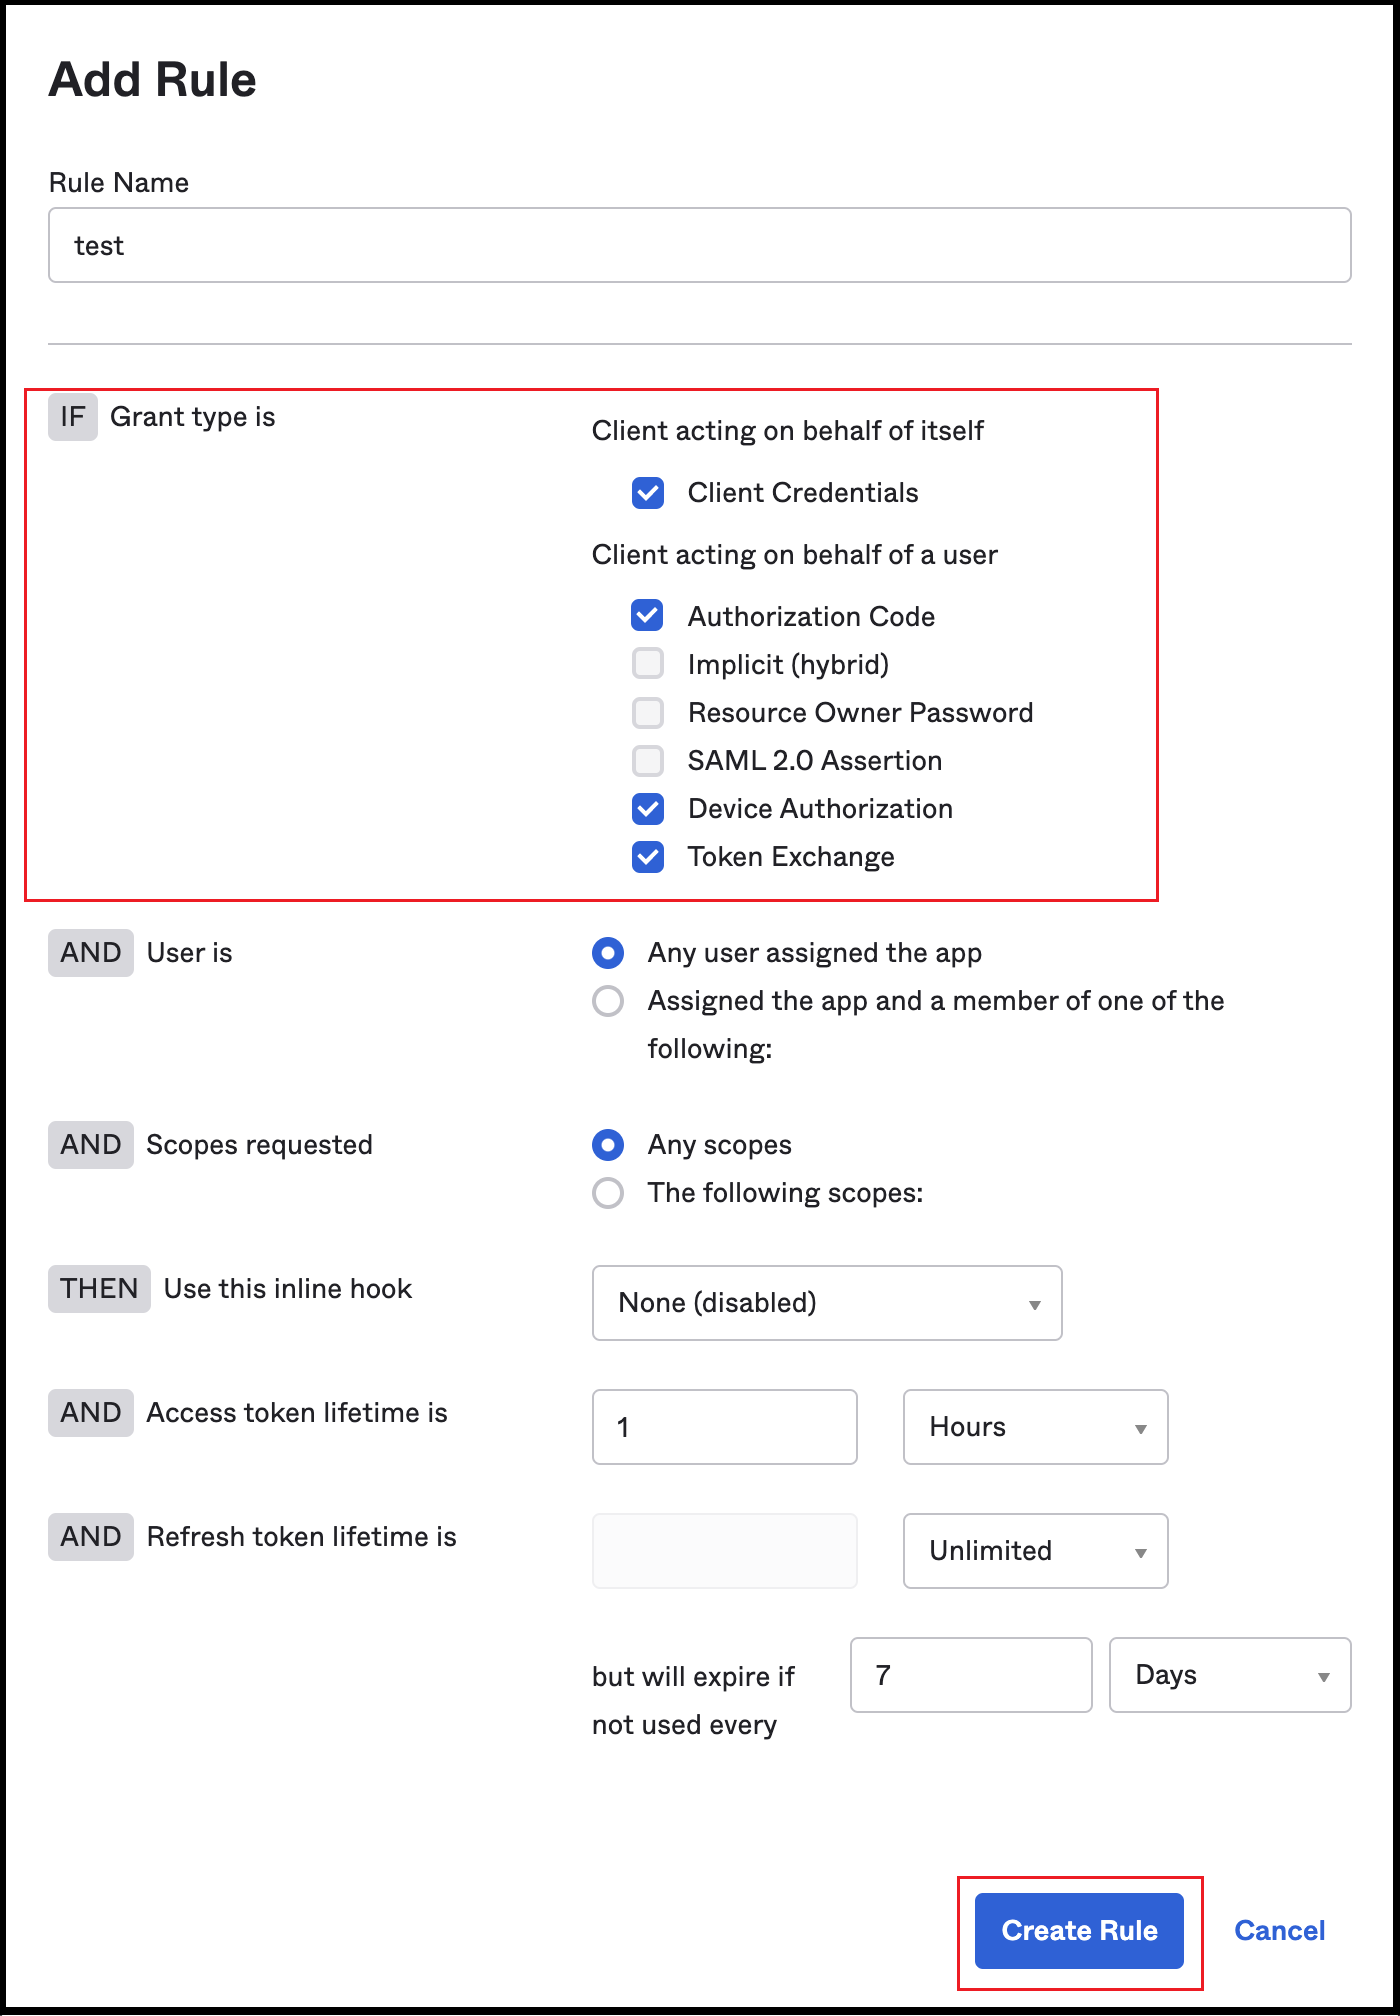
 * Add a new **Rule** inside the policy as required. Rules can be created with just a few grant type details, such as Client Credentials, Authorization Code, Device Authorization, and Token Exchange.
* Click on **Create Rule** to save the changes.
* Add a new **Rule** inside the policy as required. Rules can be created with just a few grant type details, such as Client Credentials, Authorization Code, Device Authorization, and Token Exchange.
* Click on **Create Rule** to save the changes.
 ### Step 6: Where to Find the Credentials
* Once the app is configured, the **Client ID** can be used.
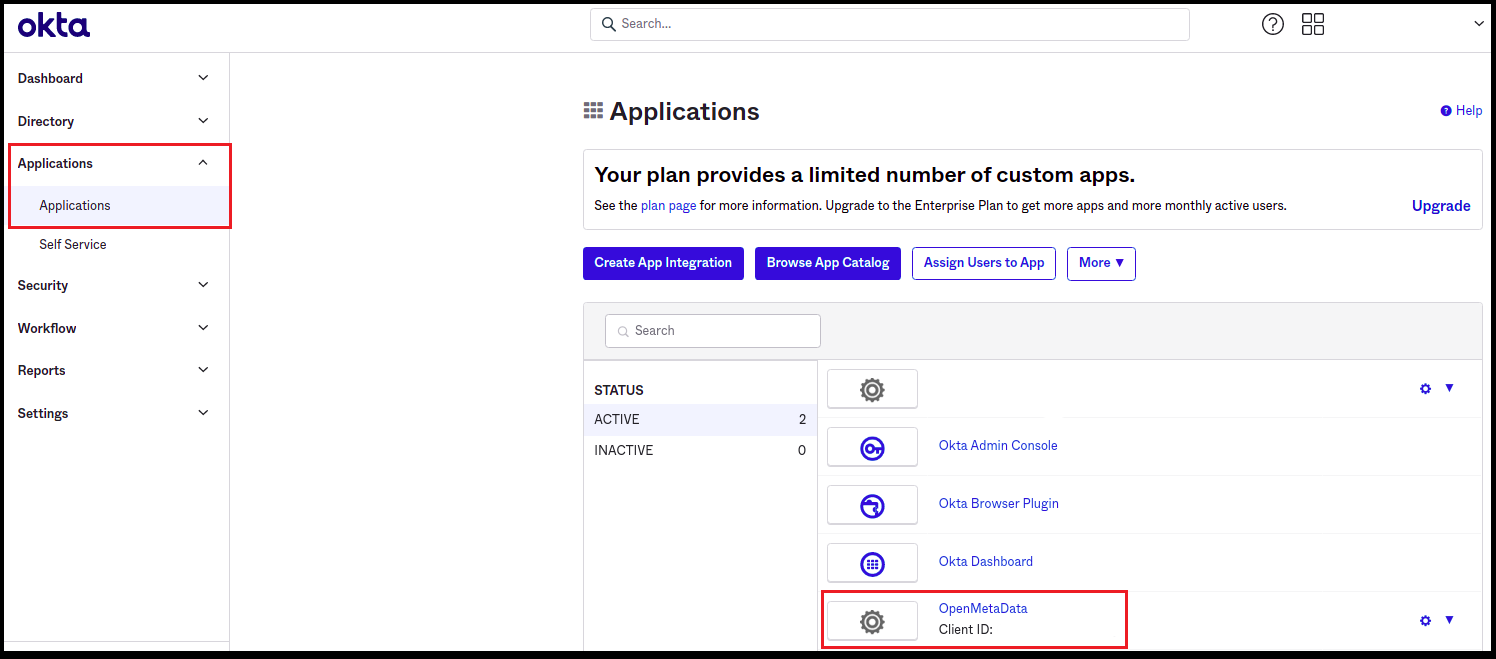
* You can also go to **Application -> Application** as in step 2.
* You should be able to see your application in the list.
### Step 6: Where to Find the Credentials
* Once the app is configured, the **Client ID** can be used.
* You can also go to **Application -> Application** as in step 2.
* You should be able to see your application in the list.
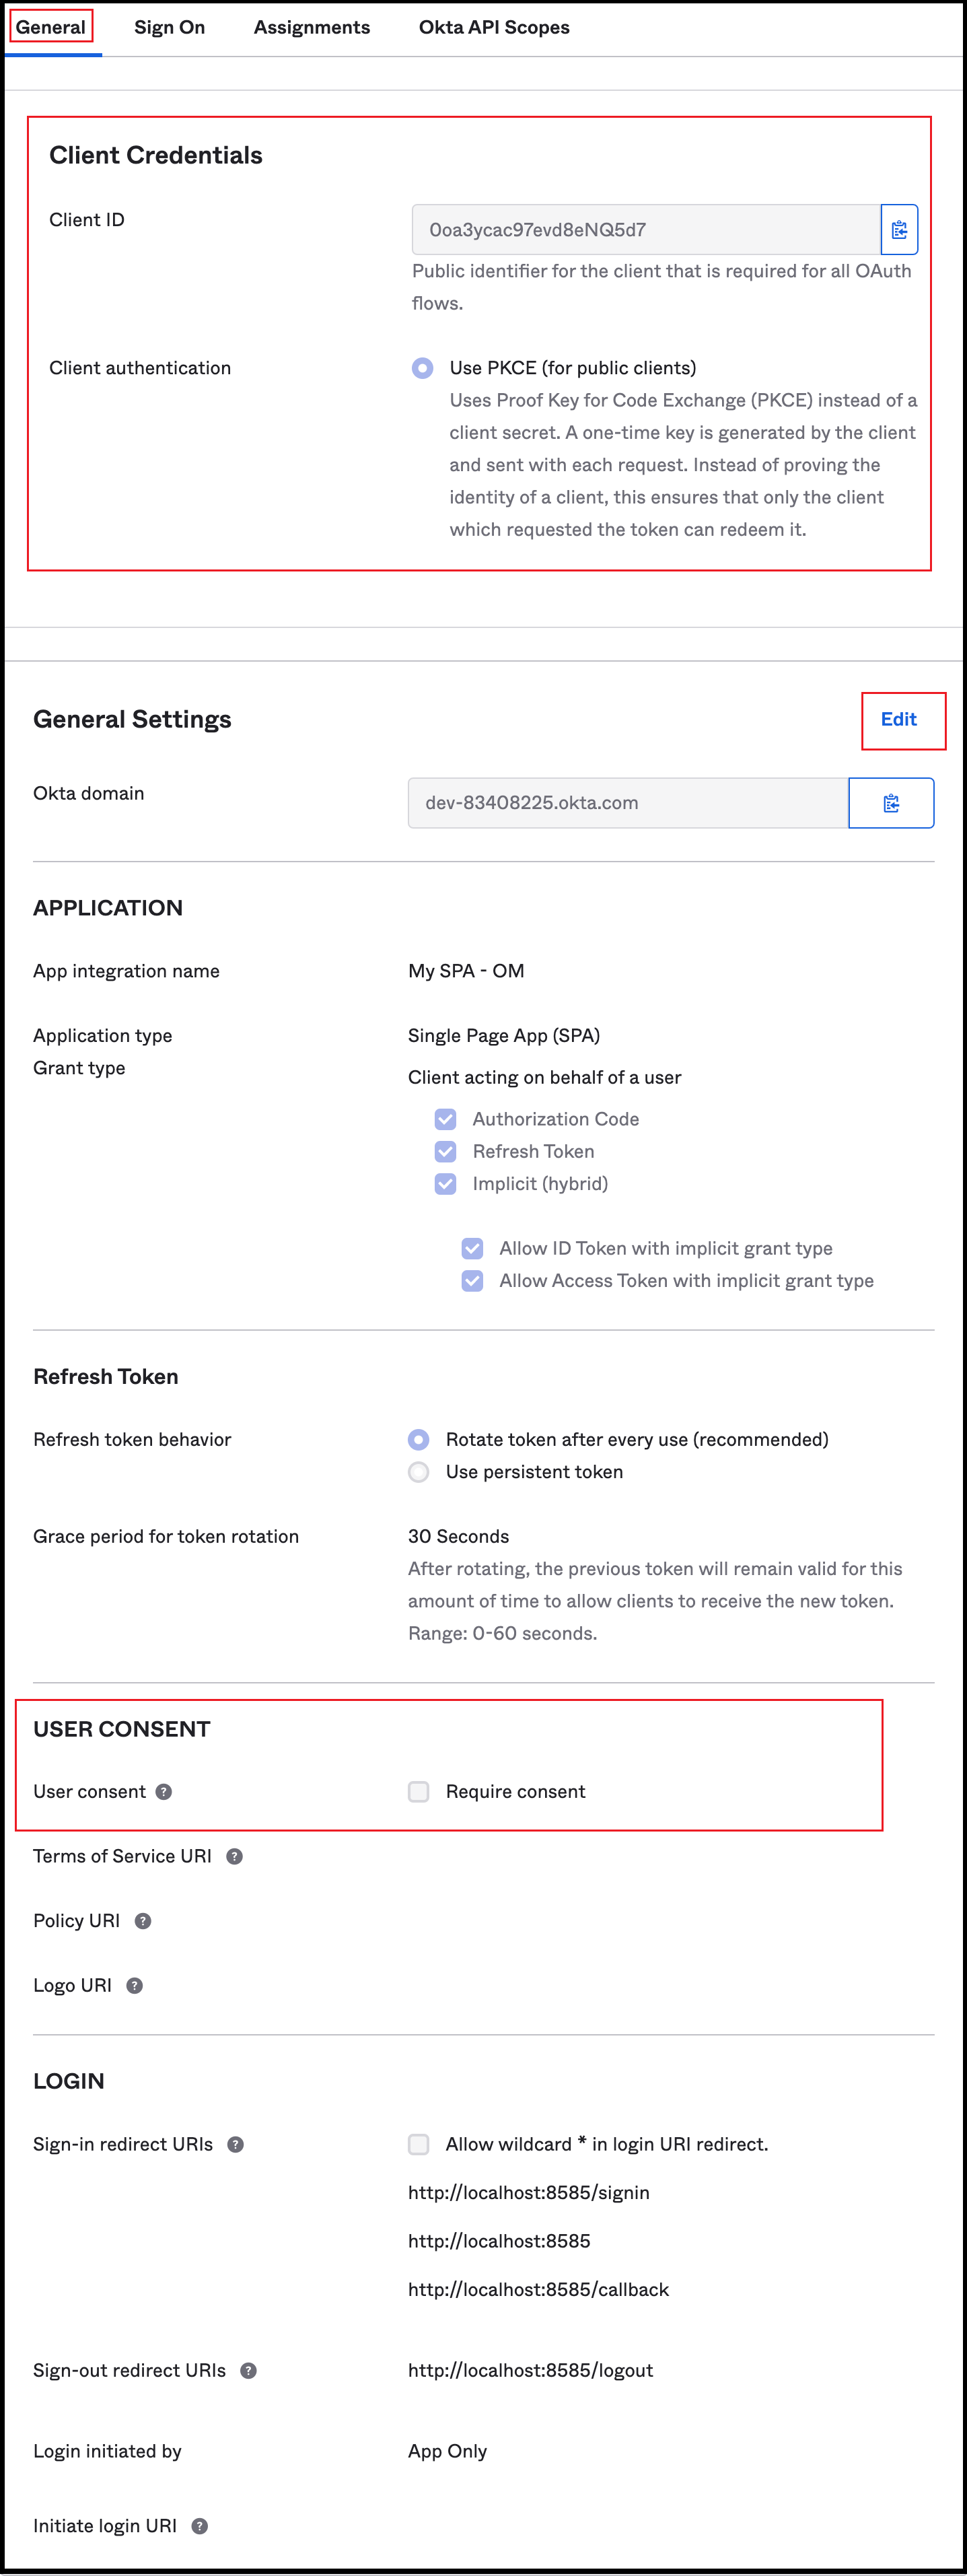
 * Click on your application.
* You will find your **Client ID** and **Okta domain**.
* The **Client authentication** is enabled by default.
* By clicking on the Edit \*\*\*\* option for General Settings, you can deselect the option for **User consent**. Save the changes.
* Click on your application.
* You will find your **Client ID** and **Okta domain**.
* The **Client authentication** is enabled by default.
* By clicking on the Edit \*\*\*\* option for General Settings, you can deselect the option for **User consent**. Save the changes.
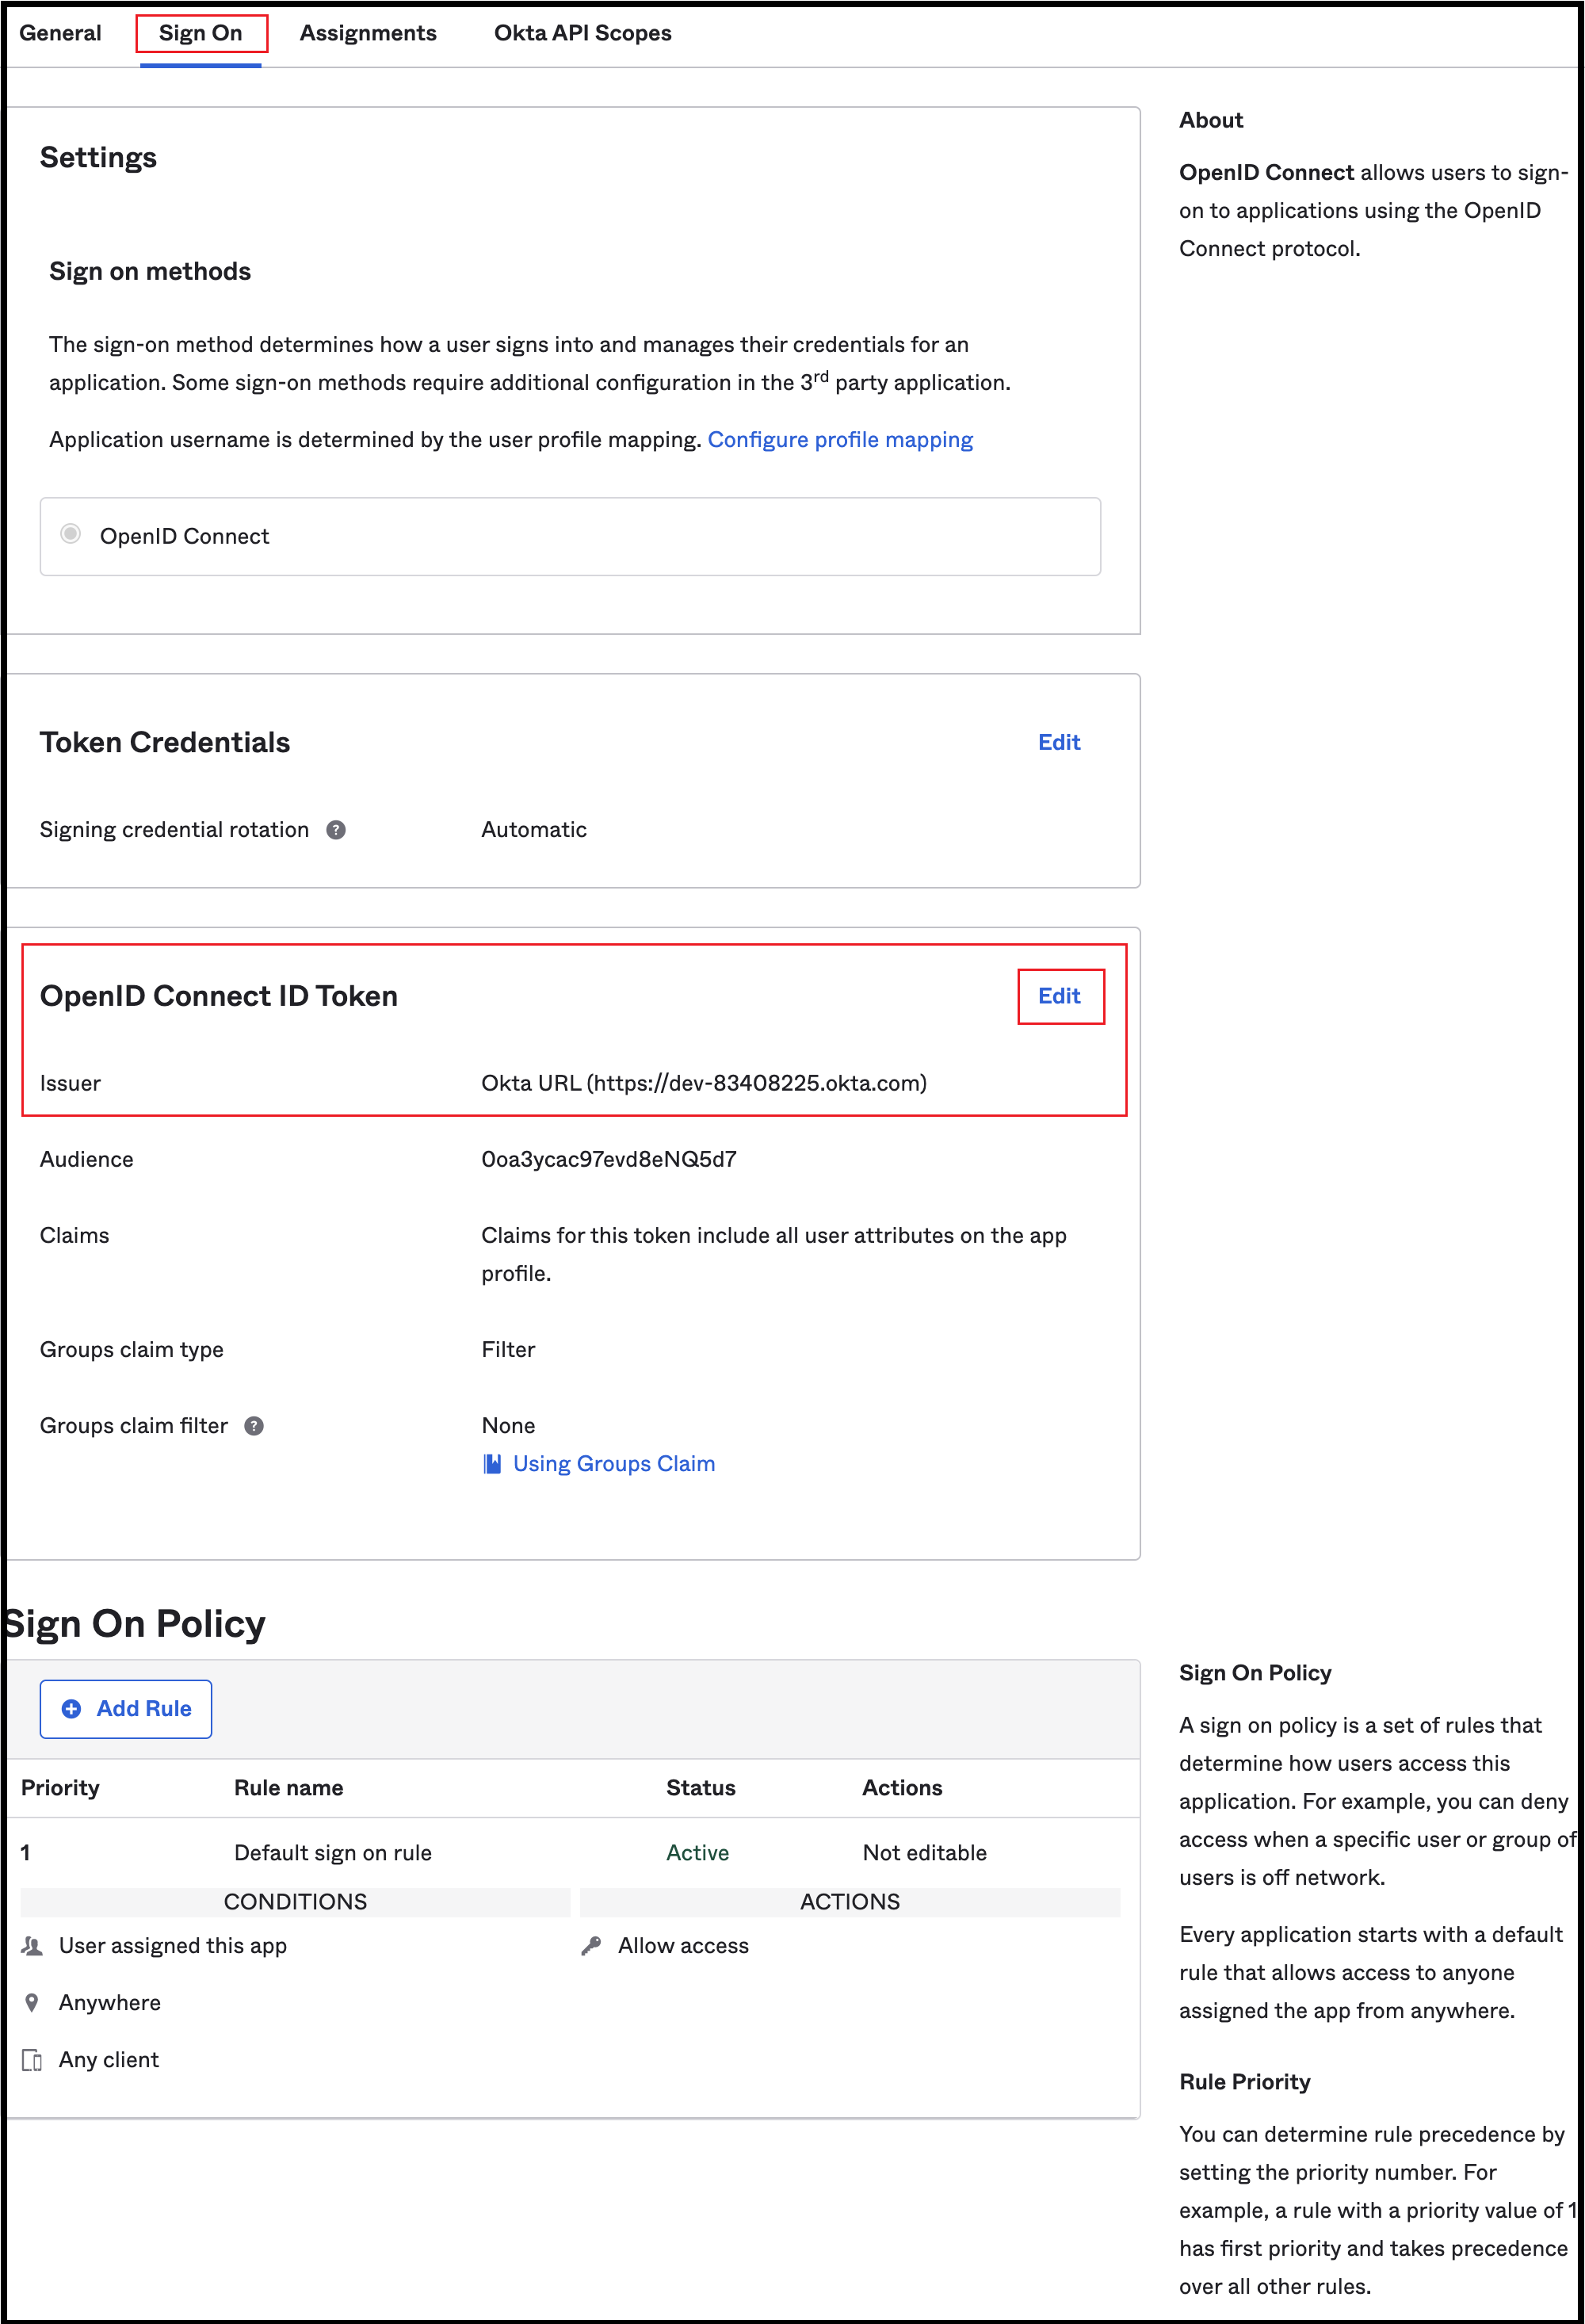
 * Click on the **Sign On** tab from the top navigation bar.
* Click on Edit for **OpenID Connect ID Token**.
* For **Issuer**, change from the Dynamic (based on request domain) option to the **Okta URL** option.
* The **Audience** is the same as the Client ID.
* Click on the **Sign On** tab from the top navigation bar.
* Click on Edit for **OpenID Connect ID Token**.
* For **Issuer**, change from the Dynamic (based on request domain) option to the **Okta URL** option.
* The **Audience** is the same as the Client ID.
 After the applying these steps, you can update the configuration of your deployment:
Configure Okta SSO for Docker deployment.
Configure Okta SSO for Kubernetes deployment.
Configure Okta SSO for Bare Metal deployment.
Go to okta Configuration
After the applying these steps, you can update the configuration of your deployment:
Configure Okta SSO for Docker deployment.
Configure Okta SSO for Kubernetes deployment.
Configure Okta SSO for Bare Metal deployment.
Go to okta Configuration